Showing posts with label Franken. Show all posts

Friday, March 5, 2010

Friday Franken - The Deranged Milliner

Alice in Wonderland comes out today and I am very excited, I love Johnny Depp, Tim Burton, and Helena Bonham Carter.  I had planned all along to pick up OPI Absolutely Alice and Mad as a Hatter for the weekend of the release but I am an epic procrastinator.  So when I went to Ulta last week to grab some and found that they were all sold out I was a bit annoyed.  My week was too busy to get down to the nail supply stores in the metroplex so I decided to use my shopping failure as a topic for my Friday Franken.

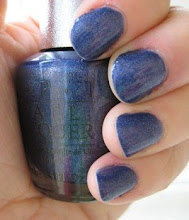
My goal here was to dupe Mad as a Hatter and I think I did pretty well though there are some differences.    From the pictures I saw there is a royal blue and more gold in Mad as a Hatter and I didn't have the right blue available.  I compensated with a little aquamarine.  Mine is darker it seems, I had a really hard time finding good close ups of Mad as a Hatter.
Deranged Milliner (3 coats) with top
Deranged Milliner close up
Materials:
  • Various Martha Stewart Glitters (list is at the bottom)
  • Wet n  Wild Clear
  • Pinch Dash Smidgen Measuring Spoons
  • Funnel
  • Ballz 
  1. Measure out 1 smidgen of each glitter, mix them well in a container while dry.
  2. Add clear and ballz.  Shake.
 
The mixed glitter before polish

I used a bunch of Martha Stewart Glitter in this, at least one color dissolved  but I'm not sure which it was, I suspect orange and green but I need to test them.   I grabbed these at Michaels in packs.

Does anyone know which glitters do/do not dissolve?

Mega list of glitter....
Garnet, Orange Sorbet, Yellow Barite, Charoite
 
Sour Apple, Aquamarine Crystal, Turquoise, Lapis Lazuli

Blueberry Slush, Watermelon, Feldspar, Sugar Plum
Sterling, Onyx, Hematite

Sunday, February 28, 2010

Friday Franken - Bronze Medal

Yeah I know its not Friday.  I wore this Friday and took the photos Saturday night but I got distracted and forgot to post it.  Has anyone seen Up?  "My master made me this collar so that I could SQUIRREL!"  Well that is me lately.

So the Olympics got me in the mood for some metallics so I am declaring this week metal week, well I might save a couple days for Alice in Wonderland themed polish since the movie is out Friday.  I realized after watching the USA take the bronze medal in woman's bobsled that I don't own a bronze polish.  So I set out to make one that matched the bronze medal from this years games.

 
2010 Vancouver Winter Olympics Bronze Medal
Materials:
  • Wet n Wild Shine Clear
  • Sinful Colors Mercury Rising
  • NYX Ultra Pearl Mania Loose Eyeshadow (Oro or Mink, the label is missing)
  • Ballz
  1. Mix 1/2 a bottle of WnW clear with 1/2 tsp of NYX eyehadow and 3 ballz, mix well.
  2. Add 20 drops Mercury Rising (this just adds some depth and makes it less gold)
  3. This only makes about 2/3 of an ounce.
This was by far the easiest Franken I have done, the NYX dissolved instantly.  I will definitely be buying more of it in different colors for future mad scientist, frankening pursuits.  Anyone have a favorite NYX color?
 
Bronze Medal
 
Bronze Medal (3 coats) and top with flash , excuse the tip wear I wore this for over 24 hours before I remembered to charge the camera batter.
Bronze Medal in sort of sunlight, minimal tip wear after almost 36 hours, pretty amazing actually.

Since the actual medal is a combination of  brushed and shiny bronze I decided on day 3 to Konad using CG Matte Magic. This was utter fail as the Matte Magic kept drying before I could get it stamped and then I ended up with white film hanging off my nails.

Friday, February 19, 2010

Friday Franken - Panama City Beach

The last three weeks of snow and rain have resulted in a fairly severe case of spring fever....when is spring break?  In my quest to cheer myself up I am focusing on all things vacation...aka, the beach!  My husband and I try to spend some time every summer at his mom's house in Panama City Beach and the inspiration for this Franken is a combination of Rescue Beauty Lounge 360 and the deep, blue gray of a summer sky in PCB.

 
Materials:
  • China Glaze Up All Night
  • Sally Hansen Xtreme Wear Green With Envy
  • Wet and Wild French White Creme
  • Sinful Colors Out of This World
  • Wet and Wild BlackCreme
  • Ballz
  1. I used an empty New York Summer bottle and added 1/4 Up All Night and 1/3 WnW French White Creme.  
  2. Add 1/4 bottle Sinful Colors Out of This World
  3. Mixed in 20 drops Green with Envy and 30 drops WnW Black Creme
  4. Add 3 ballz, shake.
 Panama City Beach
I am very happy with this color.  It looks pretty gray in some light and much more blue in other light.  It ended up being super pigmented (even though I didn't add any raw pigments) and was bottle true with one coat.  I used two coats here anyway and a fairly thick layer of the store brand top from my local nail supply mecca.
 
PCB 2 coats with top

 
PCB in sunlight

Thursday, February 11, 2010

Franken of the Week and Valentine Konad #2

I am a little behind on posting Valentines manicures so I am using today's snow day (yay) to catch up a bit.  Earlier this week I decided to work on a franken a little outside my comfort zone....light pink.  Well actually I made two frankens this week, one is a dark pink and the other is a much paler version of the same color.

Materials:
  • Sinful Colors Social Ladder
  • OPI Marooned on the Subway
  • Fingerpaints Chroma Coral
  • WnW French White Creme
  • Pure Ice Gold Mist
  • random clear topcoat
  • 2 bottles
  • Ballz
 Franken 1 (dark pink):
  1. Mix 1/3 of a bottle of Social Ladder with 1/5 bottle of Chroma Coral and 15 drops Marooned on the Subaway.  
  2. Add 30 drops WnW French White Creme
  3. Shake well
Franken 2 (light pink)
  1. Pour 1/4 of the mixed franken into a new bottle
  2. Add 1/4 of a bottleclear
  3. Add 1/5 of  Social Ladder and 1/4 of a bottle of French White Creme to lighten the polish.
  4. Add 20 drops of Gold Mist 
  5. Shake well

     
    Bubblegum (left) and Bugbite (right)
    So the polish on the right is really outside my wheelhouse, its very ummmm....pink.  When I first put it on I thought is was a pepto bismol color, but then I smudged my thumbnail and had to take the polish off to fix it.  The polish on the cotton ball looked exactly, and I mean EXACTLY, like Calamine lotion, so I am calling it Bugbite.  The darker polish is pretty much the color of bubblegum.
     
    Bugbite in sunlight, it has a slight shimmer from the Social Ladder and Chroma Coral

    I frankly couldn't handle this color solo for an entire day (really, really pastel pink) so I decided to Konad over it. First I stamped the fishnet pattern from M57 using the Konad Special polish white and then used the flowers from the same plate with the Bubblegum franken.
    Bugbite base coat, Konad White, and Bubblegum

    Always remember that nail polishes don't always play well with each other.  If you are going to play mad scientist proceed at your own risk and use proper safety procedures....yes I am a science teacher.  I am not suggesting that frankening is risk free and my franken recipes are just me recounting how I mixed up my latest potion. I take no responsibility for your mad scientist experiments.

    Wednesday, February 3, 2010

    Teal Appeal - The "Real" Teal

    Ok so I have come to accept that my definition of teal might be more of a green blue than teal as I can't really find any "teals" that match my sweater.  Maybe my sweater is more peacock blue....whatever I wanted a nail polish that matched so I decided to mix my own. RBL Teal was pretty close to perfect, I just wanted a little more green and a tad lighter so I set out to make a "near dupe."


    Materials:
    • Sinful Colors See You Soon
    • Sinful Colors Tokyo Pearl
    • New York Summer Amaranth
    • Nars Thunderball eyeshadow (mine had sadly broke months ago so I figured I'd make use of the bits)
    • Sally Hansen clear base (I don't remember which one I used)
    • Ballz

    1. Mix 1/3 of a bottle of See You Soon and 1/2 a bottle of Amaranth.
    2. Add 30 drops of Tokyo Pearl
    3. I then added 1/4 of the powder from my Thunderball eyeshadow to make the polish more pigmented and make the base more blue (See You Soon is blue glitter in a black base). 
    4. I split this mix between 0.5 oz bottles and topped them both off with clear (one bottle was a gift).

    The "Real" Teal
    The color of the resulting polish was really close to the RBL Teal but, though lighter and greener.  It is also a shimmer.  Halfway through I realized I really wanted a creme but it was too late.  In retrospect I am glad it is a shimmer as it is pretty close to RBL Teal.  The shimmer gives it a different look and makes it more of its own color.

     
    The "Real" Teal with flash (left) and in sunlight (right)...well cloud light, I hate winter.

    A close to perfect match!  I could have added a touch more blue but I wanted to stop here.

    Always remember that nail polishes don't always play well with each other.  If you are going to play mad scientist proceed at your own risk and use proper safety procedures....yes I am a science teacher.  I am not suggesting that frankening is risk free and my franken recipes are just me recounting how I mixed up my latest potion. I take no responsibility for your mad scientist experiments.

    Thursday, January 28, 2010

    Warlock


    I have a confession, I am an addict.  No not to nail polish, ok that too but that's not my confession.  I am a WoW addict.  For those of you that don't know what I am talking about WoW is  short for World of Warcraft a massive multiplayer role-play game...a.k.a. a computer game.  So three nights a week I sit in front of my computer and type and talk through a microphone to 24 other people while we try to kill new imaginary bad guys to obtain digital loot and a gain a sense of accomplishment.  I can't really explain why I do it but I enjoy it most days.

    The thing is that there is a lot of wait time associated with getting 24 other people all ready to play at the same time (even though we have a set start time), so most nights I use that time to change my nail polish.  Last week I was sitting at my desk staring at my character and thinking I should make a nail polish that matches her.  Ok I know that is weird but I think she is cute and I like the colors associated with her.  I play a warlock in the game and she typically cast spells and wears equipment in shades of purple, bright green and black.
    She casts purple and pink spells so imagine that with the green

    Materials:
    • Sinful Colors I Love You
    • Sally Girl Glitter - Fuchsia
    • Chartreuse glitter
    • Chelsea Twilight Purple
    • Fingerpaints base coat (my bottle was half full)
    • Clear Top coat
    • Ballz

    1. Add  1/8 of a bottle Sunful Colors I Love You to the Fingerpaints base coat
    2. Add 2 small funnels each of chartreuse and fuchsia glitter
    3. Add 6 drops Chelsea Twilight Purple (for shimmer)
    4. Add ballz
    5. Top off with clear
    6. Shake well 

    The chartreuse  glitter isn't very shinny, it is really sticky and likes to settle.  I really have to shake the bottle before using it.

    Though I intended for this to be a sheer polish for layering over another appropriately warlocky color, I thought I would check it out solo first.
    Its very hard to see the fuchsia glitter with multiple coats layered.  Three coats with a coat of Seche.

    Here is is layered over some random polishes in my stash. 
    WnW Black Creme
    Rimmel  Night Before
    Fingerpaints Sketched and Etched
    Pure Ice Splash


    I like it over both the Night Before and the Sketched and Etched.  The Night Before lets you see both colors of glitter the Sketched and Etched makes the green stand out more.  I was feeling a little brighter so I decided on the Fingerpaints.

    One coat Warlock over 2 coats Finger paints Sketched and Etched and a close up of the glitter
    I know its strange but it was fun combining my two addictions. Now when I look at my nails in the morning I will think about goofing off after work and who knows maybe it will bring me some good luck while playing tomorrow night.

    Always remember that nail polishes don't always play well with each other.  If you are going to play mad scientist proceed at your own risk and use proper safety procedures....yes I am a science teacher.  I am not suggesting that frankening is risk free and my franken recipes are just me recounting how I mixed up my latest potion. I take no responsibility for your mad scientist experiments. 

    Thursday, January 14, 2010

    Purple Slate

    I am constantly on the look out for a perfect purple creme, I still am not sure what that is or how to describe it but I am always willing to give a purple creme a shot as long as it isn't to grapey. Last week I thought I had discovered my match in OPI Siberian Nights only to get it home and realize it was much darker than I was anticipating. It was almost black by the second coat. I decided to experiment with some of the random polishes in my stash and try to come up with something somewhere between purple and black rather than just a really dark purple. Somewhere between charcoal and purple. Charple? Purcoal? I'm not really sure what I was going for except that I wanted it to look like dusty plums.
    Materials:
    • China Glaze Up All Night
    • Rimmel Celebrity Bash
    • WnW Black Creme
    • Color Club French Tip
    • Empty 0.5 oz bottle
    • ballz


    1. I started by filling the empty bottle ~1/4 full with CG Up All Night, this is a REALLY dark blue so I needed to lighten it up a bit to see what I was doing.
    2. Added 1/4 French Tip and shook well. This was too much, 20 -30 drops would have probably been enough.
    3. Next I added 1/4 bottle of the Celebrity Bash which made a light medium blue purple.
    4. Finally I added ~30 drops Black Creme shaking every 5 drops or so until I had obtained a darker grey purple color.
    5. After testing the color I added a little Sally Hansen Hard as Nails to thin the resulting mixture. It applies fairly smooth but does leave bald spots on the first coat, though that may be the brush as much as the polish.
    Results:
    I haven't named this polish yet, it is a cross between slate grey and eggplant. Its fairly dark in artificial light and much more purple in sunlight.


    I found it pretty hard to photograph this color,
    it is more dusty purple less blue in person. 


    Always remember that nail polishes don't always play well with each other.  If you are going to play mad scientist proceed at your own risk and use proper safety procedures....yes I am a science teacher.  I am not suggesting that frankening is risk free and my franken recipes are just me recounting how I mixed up my latest potion. I take no responsibility for your mad scientist experiments. 

    Monday, January 11, 2010

    My first Franken - Longhorn

    The week after I my entry into the strange new world of polish I found myself in a Walgreens buying a Diet Coke and some aspirin after a long day helping friends move. I had a grand total of 6 polishes to my name. Well that is until I stumbled into the cosmetics section and discovered the Sinful Colors display, two for $3.00. I bought ten.

    The next day I discovered that many of these polishes applied unevenly or left a visible nail line (which I can't abide by). A quick trip to Sally and a few dollars spent on glitter and tiny funnels later and I was set to make the best of what I had.

    I decided to start with the Serena and Chloe as I loved the color but it was way to sheer and uneven when painted.

    Here is what I started with:
    • 1 bottle of Sinful Colors Serena and Chloe
    • 1 bottle of Sally Hansen Insta-Dri Uptempo Plum
    • 1 container of Sally Girl Sparkle Effects Gold Digger
    • 1 small plastic funnel (purchased at Sally)
    • 1 empty 2 liter bottle
    • stainless steel BBs (ballz)
    I don't have a photo of Serena and Chloe as I forgot to
    take one before I began mixing.

    So this was kind of a spur of the moment experiment and I didn't take any photos of the before polish (but google shows some good swatches).

    My goal was to make the base of the Serena and Chloe more densely pigmented so it wouldn't be so sheer. I also wanted to experiment with the glitter. The 2L was necessary as I wasn't really equipped to Franken at the time.
    1. I poured about 1/5 of the Serena and Chloe into the empty bottle (hey I needed a place to get rid of it and it was handy).

    2. Added 10-12 drops of the Uptempo Plum, I really wanted to use black but again I wasn't really prepared and this was available and pretty close to black.

    3. Mixed in 1/3 of the gold glitter.

    4. Added 2 ballz.

    5. Shake, shake, shake. My husband spent like 40 minutes shaking for me.

    Results:


    The resulting polish is almost University of Texas burnt orange, its a tad bit more rust colored. The glitter is dense and the base is darker but it still really looks best with 2- 3 coats. It dries REALLY quickly and needs at least one coat of a fairly viscous topcoat. I use a nice thick coat of Seche. I LOVE the results, it is amazing in fluorescent light and sunlight. This polish really changed my mind on glitters. I really prefer shimmers as they aren't as lumpy when they dry but this came out amazing.

    Always remember that nail polishes don't always play well with each other.  If you are going to play mad scientist proceed at your own risk and use proper safety procedures....yes I am a science teacher.  I am not suggesting that frankening is risk free and my franken recipes are just me recounting how I mixed up my latest potion. I take no responsibility for your mad scientist experiments.